
Table of Contents
Maytag Washer Lid Lock error? The Step-by-Step Fix to Save Your $200 Repair Bill
Stop the flashing red light and rescue your laundry in under 10 minutes.
The Laundry Room Crisis: You walk in to finish the laundry, but the lid is clamped shut, and that red lid lock light is flashing like a heartbeat. Your clothes are sitting in soapy water, and the machine refuses to budge. Don’t panic and don’t pull the lid! 90% of the time, the lock isn’t broken; it’s just a software glitch or a bit of lint. Here is how to rescue your clothes and fix the loop without calling a mechanic.
1. THE EMERGENCY RESCUE: HOW TO GET YOUR CLOTHES OUT
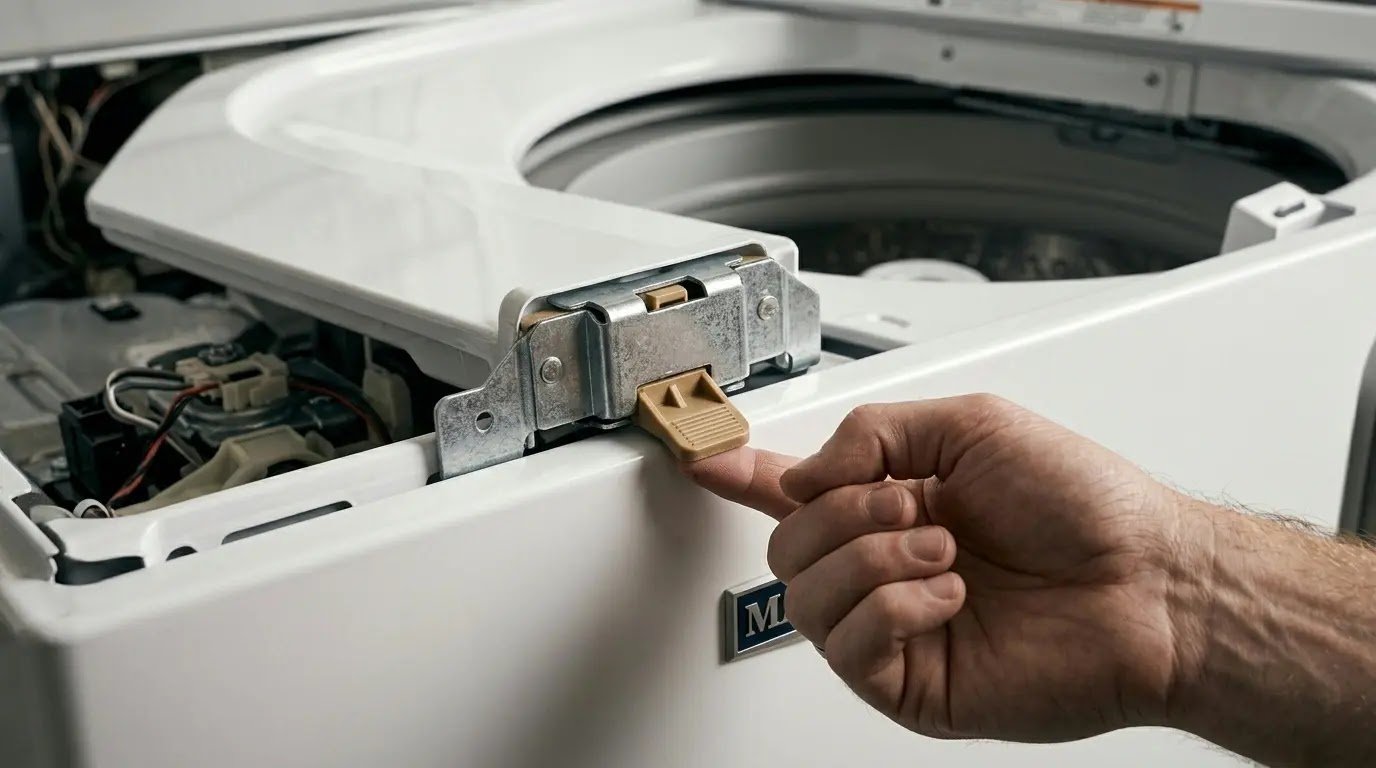
Before we fix the machine, we need to get your laundry out so it doesn’t smell. If the power cycling didn’t work, you can manually override the lock. Note: Always unplug the machine before doing this.
The Pro Trick: Reach under the front center of the top panel (or remove the two rear screws and tilt the top forward). Look for the plastic lock assembly. At the bottom of that box, there is a small plastic pull tab or a manual lever. Pull it toward the front of the machine, and you will hear a click; the lid is now free.
2. WHY YOUR MAYTAG IS STUCK: THE SOLENOID LOGIC
Inside that plastic lock box is a solenoid; think of it as a tiny, powerful magnet. When the machine’s brain (the MCU) sends electricity to it, the magnet pulls a metal bolt to lock the lid. If there is a power flicker or even a tiny bit of lint in the latch hole, the bolt gets jammed.
Instead of a broken part, the computer gets confused because the sensor can’t confirm if the lid is safely shut. This is very common in older units that haven’t followed a regular 30-minute Maytag maintenance ritual. Dust and detergent gunk are the primary enemies of these sensitive sensors.
3. LEVEL 1 FIX: THE SECRET KNOB DANCE RESET

Most people don’t know that Maytag washers have a hidden handshake that resets the internal sensors. This is the first thing a technician does before charging you $100 for a visit.
🛠️ The Calibration Sequence
Ensure the basket is empty and the lid is down. Perform these turns in under 6 seconds:
- Left 1 Click (Wait 1 second)
- Right 3 Clicks (Wait 1 second)
- Left 1 Click (Wait 1 second)
- Right 1-click (All lights should flash)
- Turn the knob until only the Rinse light is on, then press Start.
If your machine completes this cycle, the Lid Lock Loop is cleared. If it fails, your machine might be throwing a specific error code. You can find the meaning of these codes in our Master Reset Guide for Maytag Logic Boards.
4. LEVEL 2: THE TOOTHBRUSH & LINT AUDIT
If the reset didn’t work, the problem is likely physical, not digital. Lint, hair, and dried soap often build up inside the Strike (the part on the lid) and the Latch (the hole on the machine). Even 1mm of buildup can prevent the bolt from sliding fully, which triggers the error.
- The Toothbrush Fix: Use a dry, stiff toothbrush to clear the latch hole. You’ll be surprised how much gunk comes out.
- The WD-40 Warning: DO NOT use standard WD-40. It is a solvent that attracts more dust and will eventually glue the lock shut. If you must use a lubricant, use a dry silicone spray.
If your machine is frequently having sensor issues, it might be time to compare it with more modern designs. See our Maytag Front-Load 2026. Review to see if a different design fits your laundry needs better.
5. LEVEL 3: REPLACING THE LID LOCK ASSEMBLY (THE DIY PROCEDURE)

If the knob dance and the toothbrush cleaning didn’t solve the flashing red light, the internal solenoid (the tiny magnet) has likely burned out. Replacing this part yourself will save you roughly $150 in labor costs. Here is the professional teardown sequence.
Safety Reminder: Ensure the machine is unplugged. We are dealing with the Main Control Board (MCU) area, and a static spark or a live wire can fry the computer chip instantly.
- Access the Rear Screws: Use a 1/4-inch nut driver to remove the two screws at the back of the top panel.
- The Slide & Lift Technique: Unlike older machines, modern Maytags require you to slide the entire top panel forward about an inch before lifting it up. Think of it like opening the hood of a car.
- The Wire Harness: Locate the plastic plug connecting the lock to the main board. Pro Tip: Press the release tab firmly. Never pull on the wires themselves, as this can pull the copper pins out of the connector, turning a $45 repair into a $300 board replacement.
6. BUYING PARTS: THE REAL DIFFERENCE BETWEEN $10 AND $65

When you search for part number W10404050, you will see cheap versions for $10 and original Maytag (OEM) parts for $65. As an authority in appliance care, here is the honest truth.
| Feature | Genuine OEM Part | Cheap Aftermarket |
|---|---|---|
| Sensor Accuracy | High (Precision Calibrated) | Low (Frequent Ghost Errors) |
| Solenoid Strength | Heavy-Duty Magnet | Thin Copper (Overheats) |
| Lifespan | 5 – 10 Years | 6 – 12 Months |
If you plan on keeping your machine for a long time, the OEM part is the only choice. If you are planning to upgrade to a Maytag Front-Load 2026 soon and just need a band-aid fix, the cheap part might suffice.
7. EXPERT FAQ: WHY IS IT STILL NOT WORKING?
Q: I replaced the lock, but the light is still flashing!
This usually means the machine needs a master reset. The computer still remembers the old error. Unplug the machine for 10 minutes, then perform the Knob Dance calibration we discussed in Part 1 to clear the memory.
Q: Can I just bypass the lid lock with a wire?
Absolute No. Modern Maytags use a 4-wire system that communicates with the board. If you try to jump the wires, you will blow a surface-mount fuse on the control board. This is a safety feature to protect children, and bypassing it can cost you a $200 motherboard.
Q: Is there a way to prevent this in the future?
Avoid slamming the lid. The lock assembly is made of plastic, and heavy slamming misaligns the strike. For more longevity tips, check our Maytag Top-Load Teardown Report.
The Bottom Line: Master Your Home
Fixing your own washer is about more than just saving $200; it’s about knowing you are in control of your home’s hardware. If you take your time, wear gloves to protect against sharp edges, and use the right parts, your Maytag will be back in action by the afternoon. You’ve got this!